As a built-in feature in Windows, Remote Desktop has been chosen by many users to access computers remotely. However, users may find that they can’t connect to the remote computer successfully. Usually, the remote connection failure occurs because remote access is not enabled on the host computer (the computer that you want to access). Thus, learn how to enable remote access for Windows 10 computer in the following content.
Detailed steps on how to allow remote access on Windows 10
To make sure that you can use Remote Desktop Connection to remote into the Windows 10 computer, you can adjust the computer settings to allow remote access.
1. Enable Remote Desktop in Windows 10 computer from Settings
First of all, you need to enable Remote Desktop as it is disabled by default.
Step 1. Click Start and click “Settings”.
Step 2. On the pop-up window, click “System”.
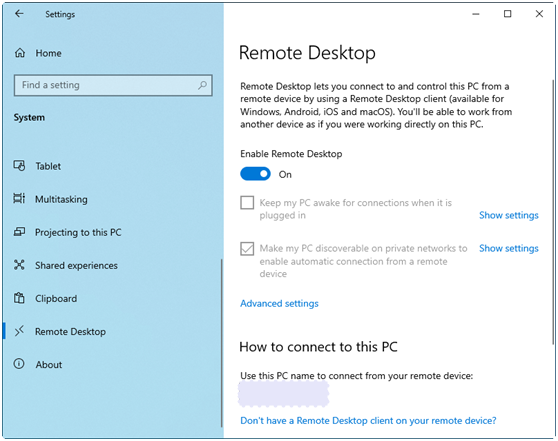
Step 3. Then, click “Remote Desktop” and drag the button rightward under “Enable Remote Desktop” to allow remote access to this computer.
Step 4. You’ll be required to confirm the operation. Click “Confirm”.
2. Enable remote access in Firewall settings on Windows 10 computer
If you just turn on Remote Desktop on the Windows 10 computer but don’t allow Remote Desktop in Firewall, you are still unable to connect to the Windows 10 computer. Now, follow the steps given below to enable Remote Desktop on Windows 10 Firewall.
Step 1. In the search box, type “Allow for app through Windows firewall” and open it.
Step 2 Click “Change Settings” button. Then, locate Remote Desktop and check “Private” & “Public”. Then, click the “OK” button to save changes.

Now, you have enabled remote access to the Windows 10 computer and can use Remote
Desktop Connection to connect to the computer.
After remote access to the Windows 10 computer is enabled, on the client computer, you
can press Windows + R, input “mstsc”, input the IP of the Windows 10 PC and follow the following prompts to complete remote connection.
Further reading: how to remote into Windows 10 without configuring Windows settings
You can switch to the easy-to-use and safe remote access software for Windows, AnyViewer, if you think it’s complicated to configure Windows settings for allowing remote access to Windows 10 computer using Remote Desktop Connection, or you encounter Remote Desktop connection issues, like Remote Desktop can’t find the computer…”.
The remote connection utility, AnyViewer enables you to control Windows 10 computer effortlessly. What all you need to do is to, download it, install and run it on the Windows 10 computer the Recipient) and the client computer (the Controller); send a control request to the Recipient or enter a security code to establish remote connection.
Here are the detailed steps on how to use AnyViewer to remote into Windows 10 computer.
Step 1. You need to know the device ID and the temporary security code of the Windows 10 computer (the Recipient). The ID and temporary code are assigned by AnyViewer and displayed on the main interface.
Step 2. On the client computer (the Controller), input the device ID of the Recipient in the box under Partner ID and click the “Connect” button.

Step 3. Here you can choose input security code and type the temporary security code generated by AnyViewer and click the “OK” button to remotely control the Recipient directly.
Or you can choose the “Send a control request to your partner” option and this way needs your partner to allow your control request. If your partner doesn’t allow your request, the remote connection will fail.
Also Read How to Transfer All Apps to a new iPhone
Notes:
- AnyViewer can not only work under all versions of Windows 10 (64Bit and 32Bit), but also work with Windows 8.1, 8, 7, Windows Server 2012 R2, 2016 and 2019.
- The temporary security code that AnyViewer generates automatically always changes every time you restart the app. You can go to Settings > “Recipient” to set a security code manually that won’t change after you restart AnyViewer.


